PanPan Dog Treats
This UI animation experimentation is based on this Dribbble shot by Daniel Tan. Check out the source code.
This is one of my all time favorite Dribbble shot. I love everything about it. The motion, the playfulness, the colors... The way the bag flows, bends and strech in a cartoon-ish way delights me. So naturally, it triggered my "I need to code this" fever.
First, the document is built like any "regular website", without the animation (using static images instead) and style is applied. The animation will need WebGL to run, and it is important that devices that don't support it (or devices with reduced motion setting activated) can still deliver the content to the user (progressive enhancement FTW).
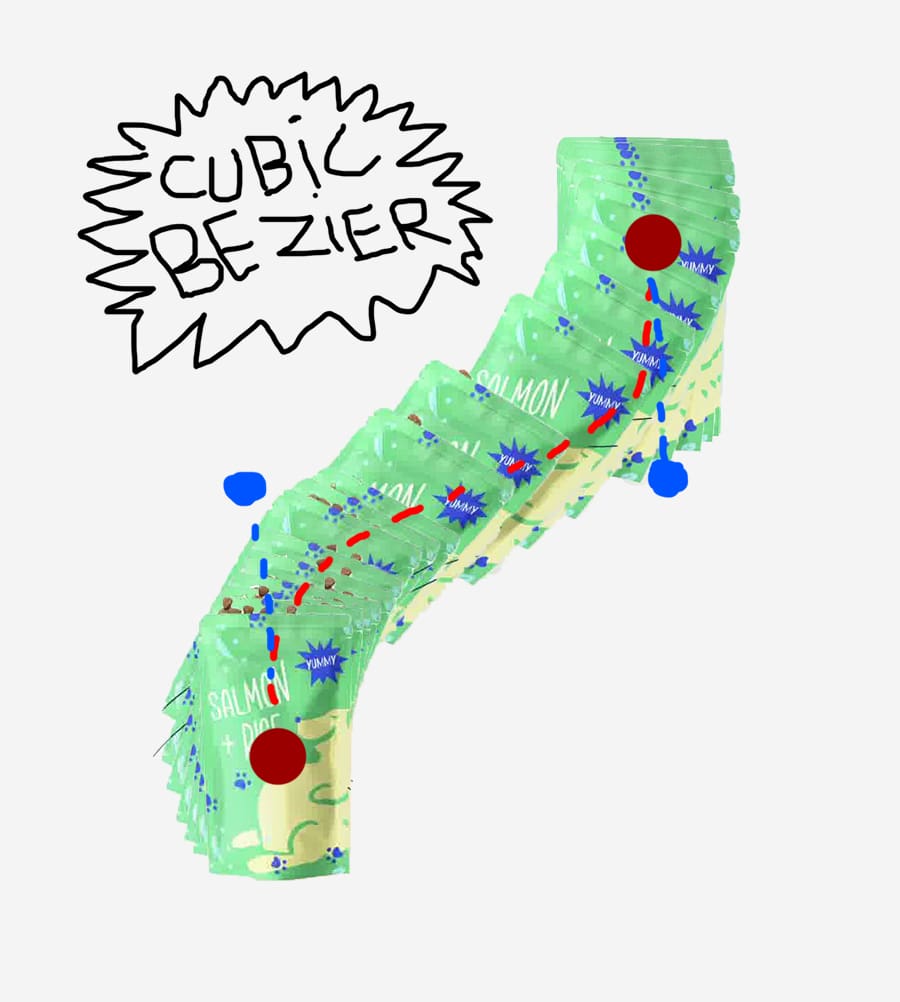
The secret sauce to the bag animation is ThreeJS's CurveModifier.
It works the following way: you give it a mesh and a path, and then, only using it's "offset" parameter, you'll be able to move the mesh along the path and it will automatically bend and twist along path's curvature 🤯.
Behing the scenes, it modifies the behaviour of the material of the mesh you've fed to it by adding its own shader logic, creates a texture storing data from the curve such as frenet frames, normals and bi-normals, that will then be used by the modified vertex shader to apply the twisting and bending. Big brain stuff, that I don't understand enough to talk about it in depth, credits to Ada Rose Canon and Graphics Noob for the implementation.
The mesh is built with a PlaneBufferGeometry and a ShaderMaterial (we'll come back to the choice of the shader material later), it use an image of the bag as a texture.
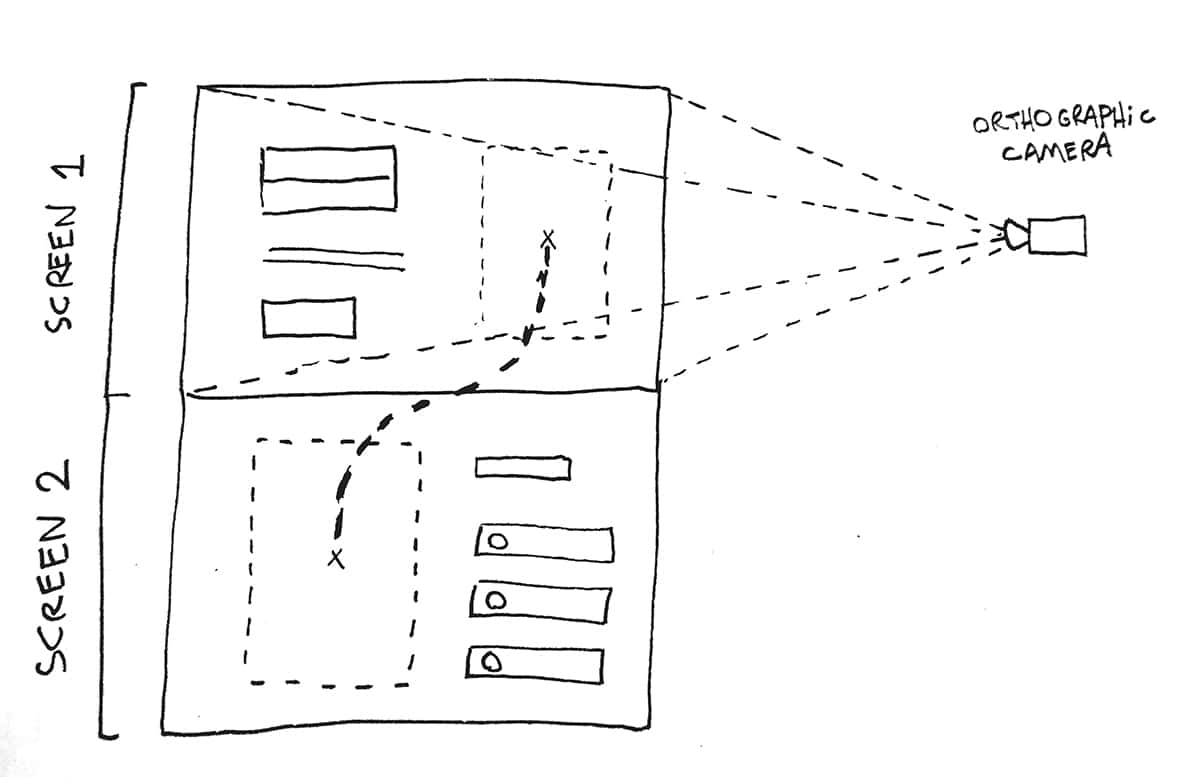
The scroll position of the user controls the amount of offset applied to the curve modifier as well a the camera position. That will gives the illusion that the bag moves in unison with the rest of the DOM.
To build the curve, we need to retrieve the positions of the differents "steps" of the bag. We can do that by using DOM nodes as markers and calling the getClientBoundingRect method on those elements.
Knowing those positions DOM coordinates, we can then convert them in ThreeJS coordinates and build our path from there.
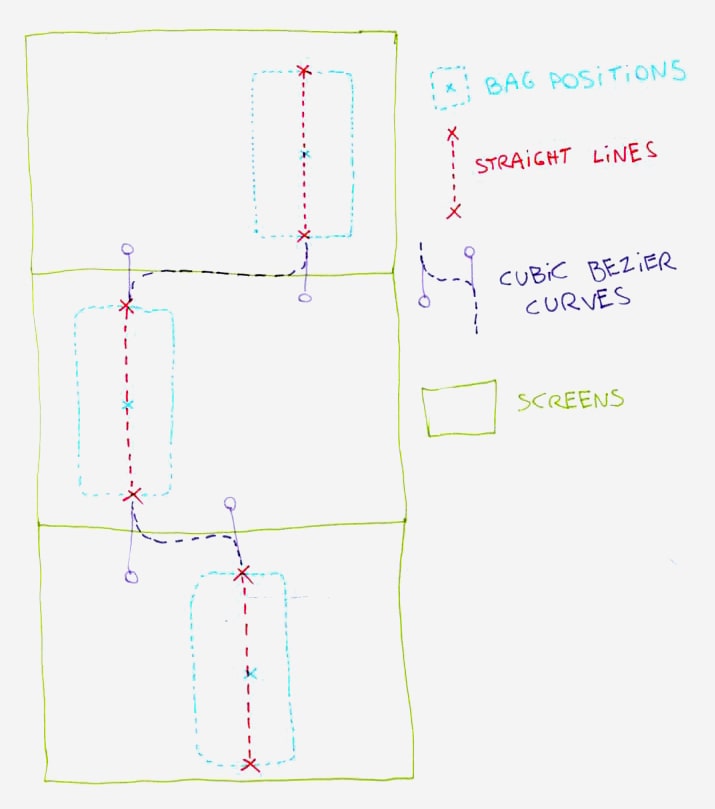
- “Why the straight lines?”
- If those aren't added between the curves, the bag will always bends. This is not the desired behaviour as we don't want any distortion to be applied to the mesh when it lands on one of its makers.
Now as you can see from the diagram, this results in very stiff curves.
To ease those curves, the easiest solution would be to add spacing to the screens using CSS. That would work but doesn't faithfully reproduce the original design.
Another solution, the one used here, is to apply an offset to the Y axis when computing positions in ThreeJS. This give a visual effect that is closer to the reference animation. We now need to take this offset into acount when computing the Y position of the camera. To keep the illusion of the bag exisiting within the DOM, camera should move faster than the scroll.
A reference to the scroll position is updated everytime a scroll event is fired. The camera position as well as the CurveModifier offset are updated every frame, lerping towards their respective targets, ensuring smooth motion and even a little bit of inertia when the user has stopped scrolling.
A reference to the scroll position is updated everytime a scroll event is fired. The camera position as well as the CurveModifier offset are updated every frame, lerping towards their respective targets.
Another cool™ aspect of the animation is when the bag disapear to reval the ingredients.
This is why is used a ShaderMaterial instead of a MeshBasicMaterial.
My original approach was to use a video input as a luma matte. The video is passed to the fragment shader using a uniform, within this shader, the brightness of the pixel is used as the alpha value of the final image (the bag texture), the scroll position is used to scrub through the video using currentTime.
This is a good technique, it is easy to implement and since it is a video, it alows a great amount of flexibility in terms of art-direction.
Unfortunately, the video scrubbing was nowhere near smooth as I expected and it just looked like the framerate dropped to 10FPS... Not good.
So I decided to get rid of the video, and recreate the transition completely within the fragment using 2D raymarching technics.
While it was fun to do, and it comes with the benefit of avoiding the extra HTTP request for a video file, this is ultimately an over-complicated solution.
I later learned, thanks to this cas study by Yuri Artiukh that because of the way I encoded the video, it lacked the necessary amount of keyframes to be smoothly scrubbed through by a browser.
Lastly, about the little colorful animated backdrops and the frame.
I initially went for a SVG only solution using the feTurbulence filter and the animate tag to animate its seed value. The result is quite nice, really simple to implement and i can style it using CSS!
Animating the three differents backdrops and the frame using this technique made the framerate dropped from 60 to... 40FPS😱
So i moved those to the ThreeJS scene, using a once again PlaneBufferGeometries and a ShaderMaterials. Now we're back at 60FPS!
If you have any question or feedback whatsoever, please reach out through Twitter or via email!
Thanks for reading!